Wednesday, August 31, 2016

WOYWW #378

These weeks are just flying by! I can't believe tomorrow is September already.  And being Wednesday, it has been deemed What's On Your Workdesk Wednesday by the wonderful Julia at The Stamping Ground. 

For my space, a mess left to dry from Monday evening.  I got
some more play time with my gelatos...I really do love them, even thought I'm still getting to know them.  So you see the Gesso that I used on the pages first and the fan that helped dry that before midnight. The pile to the left is all my stencils; sorta in folders, and the blue notebook is what I'm writing song lyrics in, to be then used in the journal.  As if writing them down previously will in any way make my writing any more legible---hell, I'll even go for somewhat visually interesting instead of the scratch that my hand usually produces! LOL! And some random scrap and paper towels, etc. 

Overall the table is much clearer, as...Ta Dah!  I got one more piece of furniture from Michael's to sorta keep things tidy.  Hindsight, the 5 drawer unit probably would have been better, but better than nothing.


And finally, a card I made for my Brother and Sis-in Law's anniversary.  Love Our Daily Bread Designs for both their stamps and there special Spellbinder dies!

So, everyone, have a great week, and if over on my side of the ocean, have a Wonderful Labor Day Weekend.


Wednesday, August 24, 2016

WOYWW #377

Hi Everyone! Look who almost forgot it was Wednesday!  The day assigned as "What's on your Workdesk Wednesday" craft-room peek-a-bout dreamed up by our wonderful Hostess, Julia, over at The Stamping Ground.

Not much to see this week; I was away for work last week, came back exhausted and not feeling great with all the heat and humidity, and then the weekend, while fabulous....was a complete blur!

So what you see: A few items that came in while I was away; the clipboard, frames and grit paste from my hero, Tim Holtz;some more gesso, a stamp/stencil set from same, some sequins that were on sale. And proof I need therapy; now that I no longer am feeding my paper addiction,  I have become addicted to these silly, colorful bits of plastic bling.  But, in my defense, they take less storage space and I'm actually using them!  (I can make 8-10 cards before you even can even tell the bottle has been openedl!)

And...yes! The start of my Christmas cards; I had actually stamped some off thinking I'd have time to color during the convention.  Wrong!  But they are ready when I am!

Now go back to Julia's and see some other creative spaces! Have a great week everyone!

Wednesday, August 10, 2016

Creative Chemistry 103: Grit Paste Grunge

Still playing Catch-up…but in one way, I feel a bit more relaxed and can explore the techniques fuller when I’m not trying to get the whole day done at once.  So this is a card I made using the Distress Grit-paste.  Fun stuff; but it does need practice. While my sample tag came out fine with the stencil, I think I put mine on too thick for the card.  It is very rough, was flaking off with the applicator, and took forever to dry.  Tim stressed you cannot heat it…and that it said so on the label; but mine doesn’t—not that I question Tim…just passing on the info.  I also wasn’t able to clean up the edges...not that I wanted a crisp line, as it was to be sand; but I just managed to get it everywhere! LOL!  As my only neutral Distress Crayon (right now) is Rusty Hinge, it was too reddish for what I wanted, so I went with Tea Dye Distress Inks...and I think it was perfect. The paint would have been too dark as well, I think. 


So thank you for stopping by.  I may (or may not,depeding on how hot/humid it is at home tonight) get one more done for the gallery…but you can keep watching here, for I will get all the lessons finished in the next 2 weeks! Lovin’ the summer of Creative Chemistry!

WOYWW #375

Welcome to WOYWW…the “What’s on Your Workdesk Wednesday”  blog hop created by Julia at the StampingGround.


It’s been a frantic week!  I’m very happy to report I actually completed 82% of the techniques from the Creative Chemistry 103 online class taught by Tim Holtz.  That is a record for any of the online classes I have done!  Some have been quite successful…some…let’s just say need some work! LOL! (see the liquid landscapes below!)

So the desk looks fairly clear and organized for such craziness-but that’s because I just couldn’t work in the chaos that my desk and table have become, and literally shoved everything into a drawer: not a good solution, I know.  The alcohol inks are still out so I can rework the liquid landscapes…and the inks I used for the Grit-Paste technique are still out, as is the stencil I used.  A few odds and ends…really not bad at all; but this weekend I need to clean out the drawer.  I have one more evening to play and upload to the class before they close the galleries tomorrow.  Depends on how hot/humid it gets; they claim the heat index will be over 100…Ugh!

 Here is a technique called Alcohol Liquid Landscapes on Yupo paper....the package holds 10 sheets...I got 2 panels from each...And I used 7 sheets.  I really want to master this one...it fascinates me!!!  I have gotten better...3 packs are being shipped as we speak...My other class posts are prior to this one if you want a gander.

So that’s me; now go back to Julia’s to portal off to other creative desks.  Have a great week everyone.


Sunday, August 7, 2016

Creative Chemistry 103: Gesso Fresco revisited

I absolutely LOVE the look of this technique!!  When doing the class tags, I thought it would be stunning in a journal...so I decided to give it a go.

Now, I only have the one set (so far) of the Distress Crayons, and this technique works better with darker colors, or at least, is a tad more noticeable-but I wasn't feeling  the cool colors, so mad do with the warms...

I've been sorta working on a song lyric theme for the pages in my journals, and Love "Take Me To Church" by Hozier...at least the melodic lines...have you read the lyrics??  And I have quite a few stencils that look like Abbey ruins, so it sorta fell in place.  The stencils are by TCW on the left and Stencil Girl on the right.  And yes, my handwriting sucks..and this is with a journaling template...
I went in with a PITT pen to sorta emphasize some of the lines, particularly the bird...

I'll be doing this one again....and yes...getting more colors....(did you hear..all the colors will eventualy be released--Oh Joy!)
Thanks for stopping by.


Creative Chemistry 103,: Day 6: Textured surface and Foil Sheets

Hi everyone,
We've reached the last day of this fantastic class from Online Card Classes, the Creative Chemistry series taught by TIm Holtz.  It has been fantastic.  And just because the "live" part is over (well, there is one more "Catch up week), doesn't mean you can't still take it...as with all their classes, you have lifetime access to the content--only the forum's and galleries get closed to new postings. It's been great to learn new ways to use the stash you already have...yes, I know...don't play coy...

So today wasn't so much a lesson, as breaking down some of the new surfaces and substrates. (and yes, most were already in my stash...being horded for god knows what...

My example today uses the Burlap sheet from the Textured Surfaces, as well as the Foiling Technique....and I love that!!! I better order a few more packs of this too!
I took the image from the Watercolor Resist lesson, added some gold foiling around the edges...hard to see, but it's there, then layered over the self-adhesive (thank god...can't imagine trying to glue this down!) Burlap,


You can sorta see the foiling better here.  I'm going to add a banner, once I find my missing stamp...along with my missing DIY distress pad and the Picket fence ink pad...this has been a tough week for my already taxed organizational skills...just about every TH related medium or item is stacked on my desk!

Thanks for stopping by.

Creative Chemistry 103 Day 5, Post 4

As I have been doing this week, this post is to link to the class gallery.  The original post can be seen here.

This is the Faded Texture Technique on Translucent Yupo paper.

Creative Chemistry 103 Day 5 Post 3

As I have been doing this week, this post is to link to the class gallery.  The original post can be seen Here.

This is the Faded Layers technique on Yupo Translucent paper.

Creative Chemistry 103, Day 5 Post 2

As I have been doing this week, this post is to link to the class gallery.  The original post can be seen Here.

This is the Alcohol Ink Stamped Resist on Yupo paper.


Creative Chemistry Day 5: Alcohol Inks and Yupo Papers

 Nearing the end of this phenomenal Online Card Classes course taught by Tim Holtz.  It has been great learning new techniques and variations of others for all the mediums, supplies and stash I already had. Plus, like today, makes me remember how much I like playing with alcohol inks...and this new Yupo paper is pretty cool stuff!

Like the other days, This is my main blogging page, and the following 3 posts are just to get photo's to link up with the class gallery.  

I'll admit; I was blown away with the Fluid Landscapes, so that is all I worked on that night.  And when Tim says "One hot mess"...he meant it!  But like he also said; it does get better.  I'm still not to great, but definitely better.  So here is my final attempt of the night (my previous attempts are on my Instagram site: pussnflutes). 


I did finally get around to the Faded Textures, Faded Layers and Stamp Resist...and I think the results are definitely clearer than on regular glossy papers.

This is the Stamp Resist; which does need to be thought out, or at least approached backwards...but can be very effective.  The stamp is by Clarity Stamps, and the saying is from Verses.


This was the Faded Layers, on the Translucent Yupo...very cool effect--even if the photo doesn't really show it off too well.

And Finally, the Faded Textures; also on Translucent Yupo...Yes, I'm hording the regular pack for more of the Fluid Landscapes...until I get more...which will be ordered tomorrow...along with more gesso...

So there is a majority of the Day 5 lessons; with luck I'll get to the remaining 2 before the week is over.  Thanks for stopping by.

Friday, August 5, 2016

Creative Chemistry 103 Day 4: Post 4

This and the 2 preceeding posts are to link the photo's to the online class gallery.. You can see the original day's post HERE.

Creative Chemistry 103 Day 4: Post 3

The following 3 posts are to get the photos linked to the Online Card Class Gallery...to see the full blog post, visit HERE...


Creative Chemistry 103: Day 4, Post 2

the following 3 posts are just so I can get the photos up to the Online Card Class gallery...to see the full day, see my blog post HERE.


Creative Chemistry 103; Day 4 --Distress Crayons!

Today’s lessons are all about the Distress Crayons…and I’ll confess; while new to my craftroom, I’ve become a Gelato addict…so when I saw the crayon video’s from CHA, I was very excited, as these would be more “earthy” colors. So after trying the set out, I was a bit bummed.  Close but not the same as gelatos…but now! The lessons show the differences and why and how to best use them. So Com’on rest of the colors!!  I’m going to get the other 2 sets this weekend!

First up was the Crayon Smudged Technique.  My stencil is not the best choice; too much depth/roughness to truly smudge, (my fingers not happy! LOL!) but I’ve got the gist, and will rework it this weekend--plus I need to make a mask for the postage edges...I'm only so neat!

Then there was the Crayon Gesso Fresco…and Holy Camoly!  This is going to be stunning in a journal! I got carried away, despite my time restraints, and did a bunch; here are the better 2.

Then the Textured Resist. I picked another tricky tight stencil…but still love how it came out; but now I really need the white crayon.

And finally the Watercolor Resist Technique…and this too shows great possibilities!  Here is just the image; I ran out of gas to finish the card I have in mind..so stay tuned. 


So with luck, after the Day 6 lessons on Saturday, I’ll be able to catch up on the 6-7 techniques I missed during the week…and then actually start to use them, not just do the exercises.  So stay tuned!

Thursday, August 4, 2016

CC103 day 3 post 2

All the details of my Day 3 experiences are on the previous post, but I can't find a way to post multiple pictures from the same link..so this is just the photo. And I can't get their video on their inlink tool to work...so here you go...just the tag from the texture paste embossing technique.


Which, by the way....ROCKS!

Creative Chemistry 103 Day 3--Texture Paste front and center!

More experiments from the Creative Chemistry 103 class at Online Card Classes.  Thankfully my texture paste sample pack and grit paste arrived that morning....otherwise I'd really be behind. As it was, it was not my best evening.  My little tin foil pan I got out to soak my stencils in so I wouldn't have to waste time washing everything between steps must have had a pinhole.  I start hearing a tapping, find it's water running down my desk onto the trimmer on the floor! the whole desktop was flooded...which I should have noticed sooner as my stamping mat slipped a little, which was weird.  And, even though it wasn't hot, it was more humid than I thought, so the paste took forever to dry.  Will bring a fan upstairs to try these again.

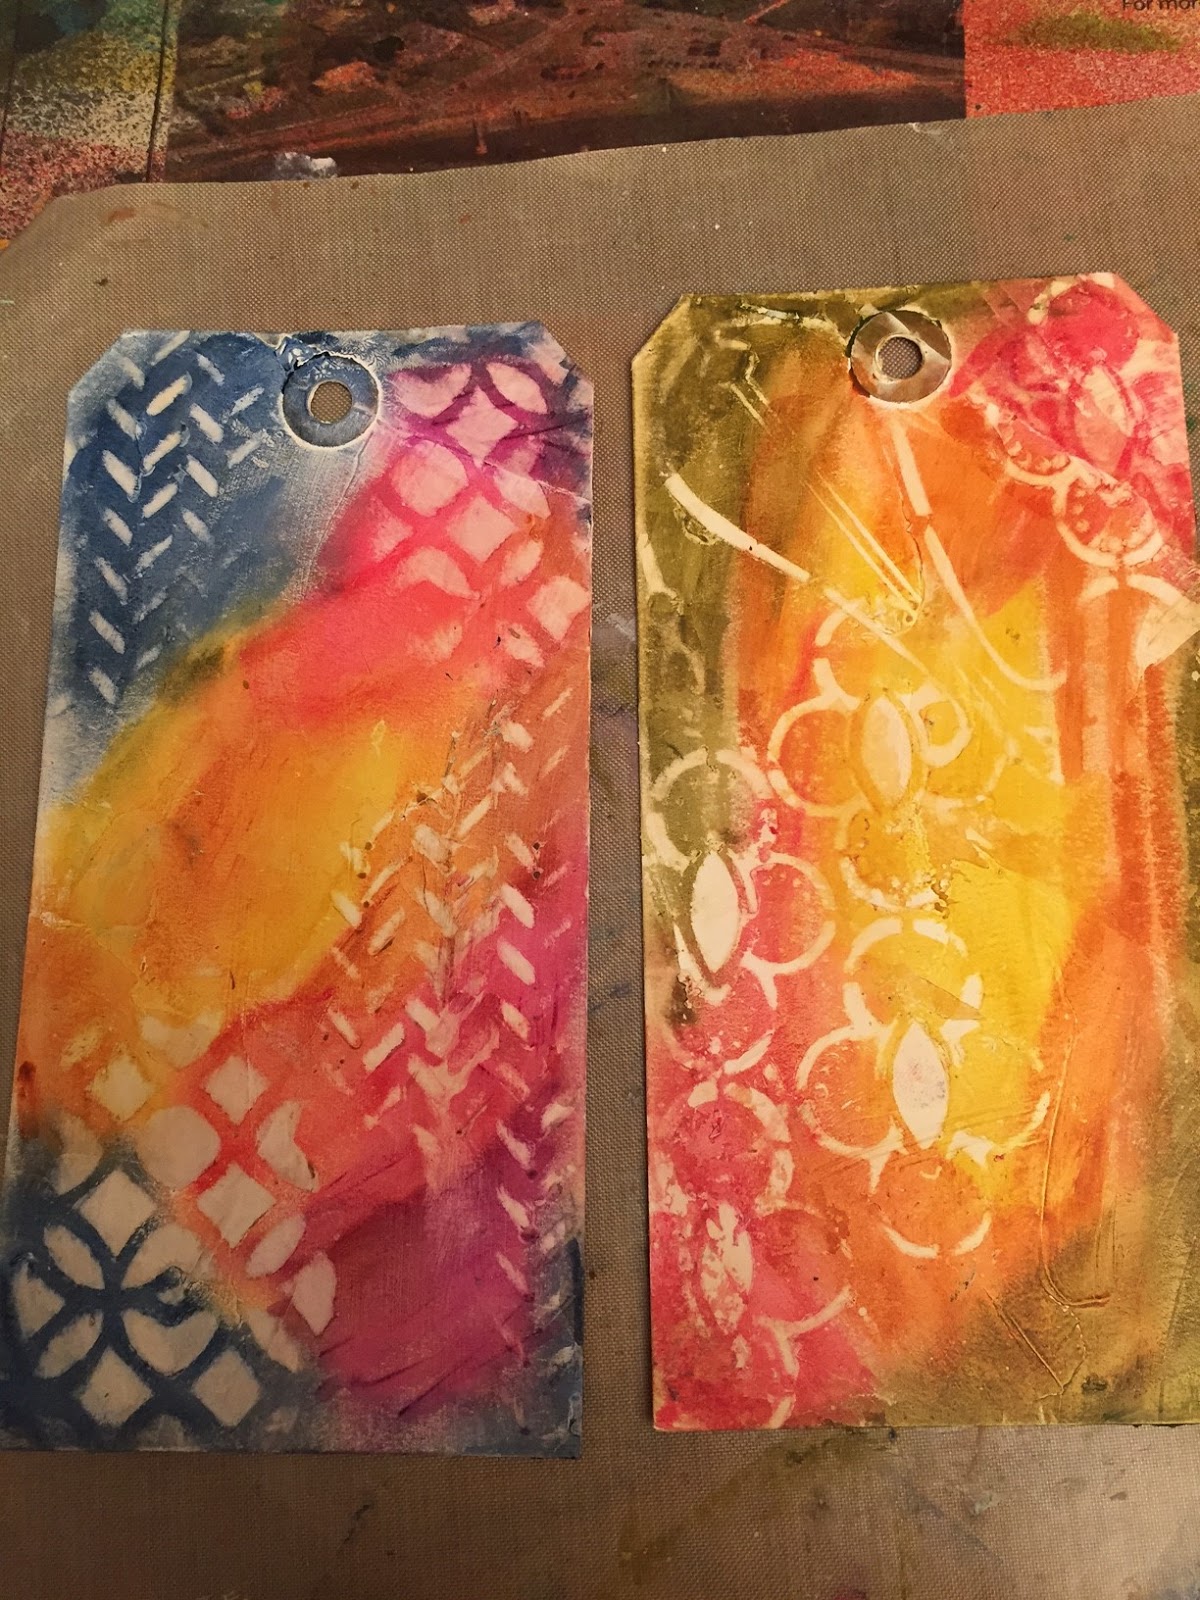
So all I have to show are my sample tags, and just on the Texture Paste Coloring and Embossing techniques.  I also did the texture paste sample tag, but did it backwards, and also forgot that Tim said to watch out for too wet application, So by the time I got all dried up, I went with quick and sprayed the hell out of it, and yes, the color does go under the paste.

So here is the first one, the Texture Paste Coloring Technique...and this shows promise!  In the past I've colored my molding paste with either paint or gelatos, and yes, it does change the color. I love how the colors stayed true.  I used distress paint on the top, a little mowed lawn spray stain bottom and a dash up top, and then regular distress inks everywhere else.   I can't wait to try this again for real!


And then the Texture Paste Embossing technique!! HOLY CRAP!  while this might be a more limited application...it does have a WOW factor!  I never really like the Queen's Gold EP, but it was the first jar I grabbed, and it was perfect for this...adding the Hickory smoke, salty ocean and peacock feather inks, and it popped!

So there is my day 3 experiences...I have 2 lessons to catch up on (I have never liked my collages, so that is a "if there's time" one)  plus whatever today holds...yup, I really need to retire!!
Thanks for stopping by.

Oh and am I the only one that smells lemon custard with the transparent glossy texture paste?

Wednesday, August 3, 2016

Creative Chemistry 103: Day 2 Post 3 Luminous Mica

My “quick” technique for the night.  (I think I need to play hooky from work to keep up!)  This is a great background! 

While I was planning on being lighter, then using snowflakes, it got a bit dark.  Instead of a tag, I cut a manila file into the postage stamp.  As my files are all beyond the reuse stage at work, they are pretty worn, so the paper really absorbed the water!  I may not finish this as intended, but in person, this is so rich looking! It won’t be going to waste!

Creative Chemistry 103: Day 2 Post 2 Distress Paint Lifting

Since I watch the class videos during my lunch hour, it made for a long afternoon as I couldn’t wait to try this this evening.  I had posted a question after watching the video if we can substitute gesso for the picket fence distress paint, and Tim replied…”I’m sure you could, give it a try”…so here we go.

Studio Gesso is the left page, and the Distress Paint is on the right.  I admit, I wasn’t overly careful on the application, and it was pretty thin so it could dry while I did the resist technique…
My first impression: the following paints seemed to stick and stay put on the gesso, but they were slipperier on the distress paint.  Acted sort of like a glazing agent had been applies as I was spreading them around.  But aside from that, the technique worked the same, and visually I can’t tell the difference. 


I tried not to overthink the paints, but then once done, while pleased with the techniques, the rest of my page idea sort of fell apart.  So out came a new stamp set (Woodware)…and I should know better, as I rarely get good stamped images once the book has been worked in.  I tried to use the MISTI to get a solid surface behind the page, but I only have the mini one, and as it becomes enclosed with the frame, it’s pretty much impossible.  And as these were clear stamps, I couldn’t hand hold them to push them down; I would have tried if they were on cling foam.   Ah well.  I’ll try another this weekend.   

Creative Chemistry 103 Day 2 Post 1 Distressed Paint Resist

I need to resist more! No, really…’cause I love the look.  My stamp choice probably not the best, or maybe the Spun Sugar not the best choice, but I love how this came out; not sure what I’ll do with it, again with the start of the bird, but I’ll think of something, so stay tuned. 

Actually, while typing, hmmm, I have a bird die...yes stay tuned...and idea is peculating...

WOYWW #374

Welcome to WOYWW…the “What’s on Your Workdesk Wednesday”  blog hop created by Julia at the StampingGround. 


Real quick post this week, as I’m trying really hard to keep up with the daily lessons on Creative Chemistry 103 with Tim Holtz on OnlineCardClasses.com.  So I need to spend my lunch hour (my usual blog time) to watch the videos so I can jump right in at night.  So far, while I can’t get all techniques done, I have managed to get 3 a night. 

So, here is the desk last night taken when I thought I was ready to stop...then hubby took care of Dakota, so I had a few more minutes to finish the page. You see the journal, the stencils, the distress paints, a few stains still lying around…yes, it is a mess! 

I’ll be posting the individual techniques a bit further on, so please check back often.

Now go back to Julia’s to portal off to other creative desks.  Have a great week everyone.


Tuesday, August 2, 2016

Creative Chemistry 103, Day 1 Post 3

And here is my final technique that I managed to try on Day 1:  The original post is HERE.

And then, since it was out, my final experiment was on the Distress Micro-Glaze Resist.  This is Awesome!!!  I only got as far as a tag, as at this point it was way past my bedtime, and just couldn’t think of how to finish it…but that little jar of glaze is going over to my art journaling station!  I love how everything layers over it. 

Creative Chemistry Day 1, Post 2

So, to link to the Online Card Classes gallery, you need one image per post/link.  So here is the 2nd one.  You can see the original post HERE.

My next technique was the Distress Washed Watercolor.  I don’t have the Distress Micro-Glaze, but I have the original Judikins Micro-Glaze, which I think I’ve used once in 5 years.  I’m thrilled its still usable.  While I didn’t put enough in the center of the image, I think when I buffed it out I spread it out too much along the edges.  The stamp is from a limited editions set Tim did for Simon Says Stamp.

Creative Chemistry 103 Day 1

I’m so excited that Tim is doing another Creative Chemistry class over at Online Card Classes!  And for once, I only needed to pick up a few items from the supply list…Yay!  But of course, my Simon Says Stamp order hasn’t arrived yet, Boo! , so I’m missing the DIY ink pad for day 1, and I couldn’t find my Picket Fence ink pad, so I only managed to explore 3 of the first 5 techniques. 

So up first: Distress Off-set Stamping.  I didn’t think I’d like this, as it would make your eyes go oggy.  I was wrong...this is amazing! I probably didn’t off-set it enough… though I really tried on the second Iris. I was using the mini MISTI, so thought I could control it better. So it’s hard to see, but it’s there. The stamp is from Our Daily Bread Designs, and the saying is from a Hero set.  I think I used all of the Distress Purples on it.   

My next technique was the Distress Washed Watercolor.  I don’t have the Distress Micro-Glaze, but I have the original Judikins Micro-Glaze, which I think I’ve used once in 5 years.  I’m thrilled its still usable.  While I didn’t put enough in the center of the image, I think when I buffed it out I spread it out too much along the edges.  The stamp is from a limited editions set Tim did for Simon Says Stamp.

And then, since it was out, my final experiment was on the Distress Micro-Glaze Resist.  This is Awesome!!!  I only got as far as a tag, as at this point it was way past my bedtime, and just couldn’t think of how to finish it…but that little jar of glaze is going over to my art journaling station!  I love how everything layers over it.


So there is Day 1.  As this is only 1 week, I should be able to stay current with all the lessons…so stay tuned! Thanks for stopping by.