Wednesday, April 27, 2011

Dimensionally Grungy!


Hello again fellow crafters!! This week for Grungy Monday, our fearless leader Linda at Studio L3 has led us to, what I felt was quite a fearsome challenge! Tim Holtz's Technique challenge from May, 2008., involves adding dimension to your scrapbook pages, cards, and ATC's. His blog had many steps, so I copied and pasted away first thing Monday and came home with a novella, of sorts! LOL! Our Guest Designers did a great job, and Helen said if she could do it, anyone could, so with that, and a day off from work, which is usually very motivating, I boldly stepped into the stamp room--with not a clue in my head!


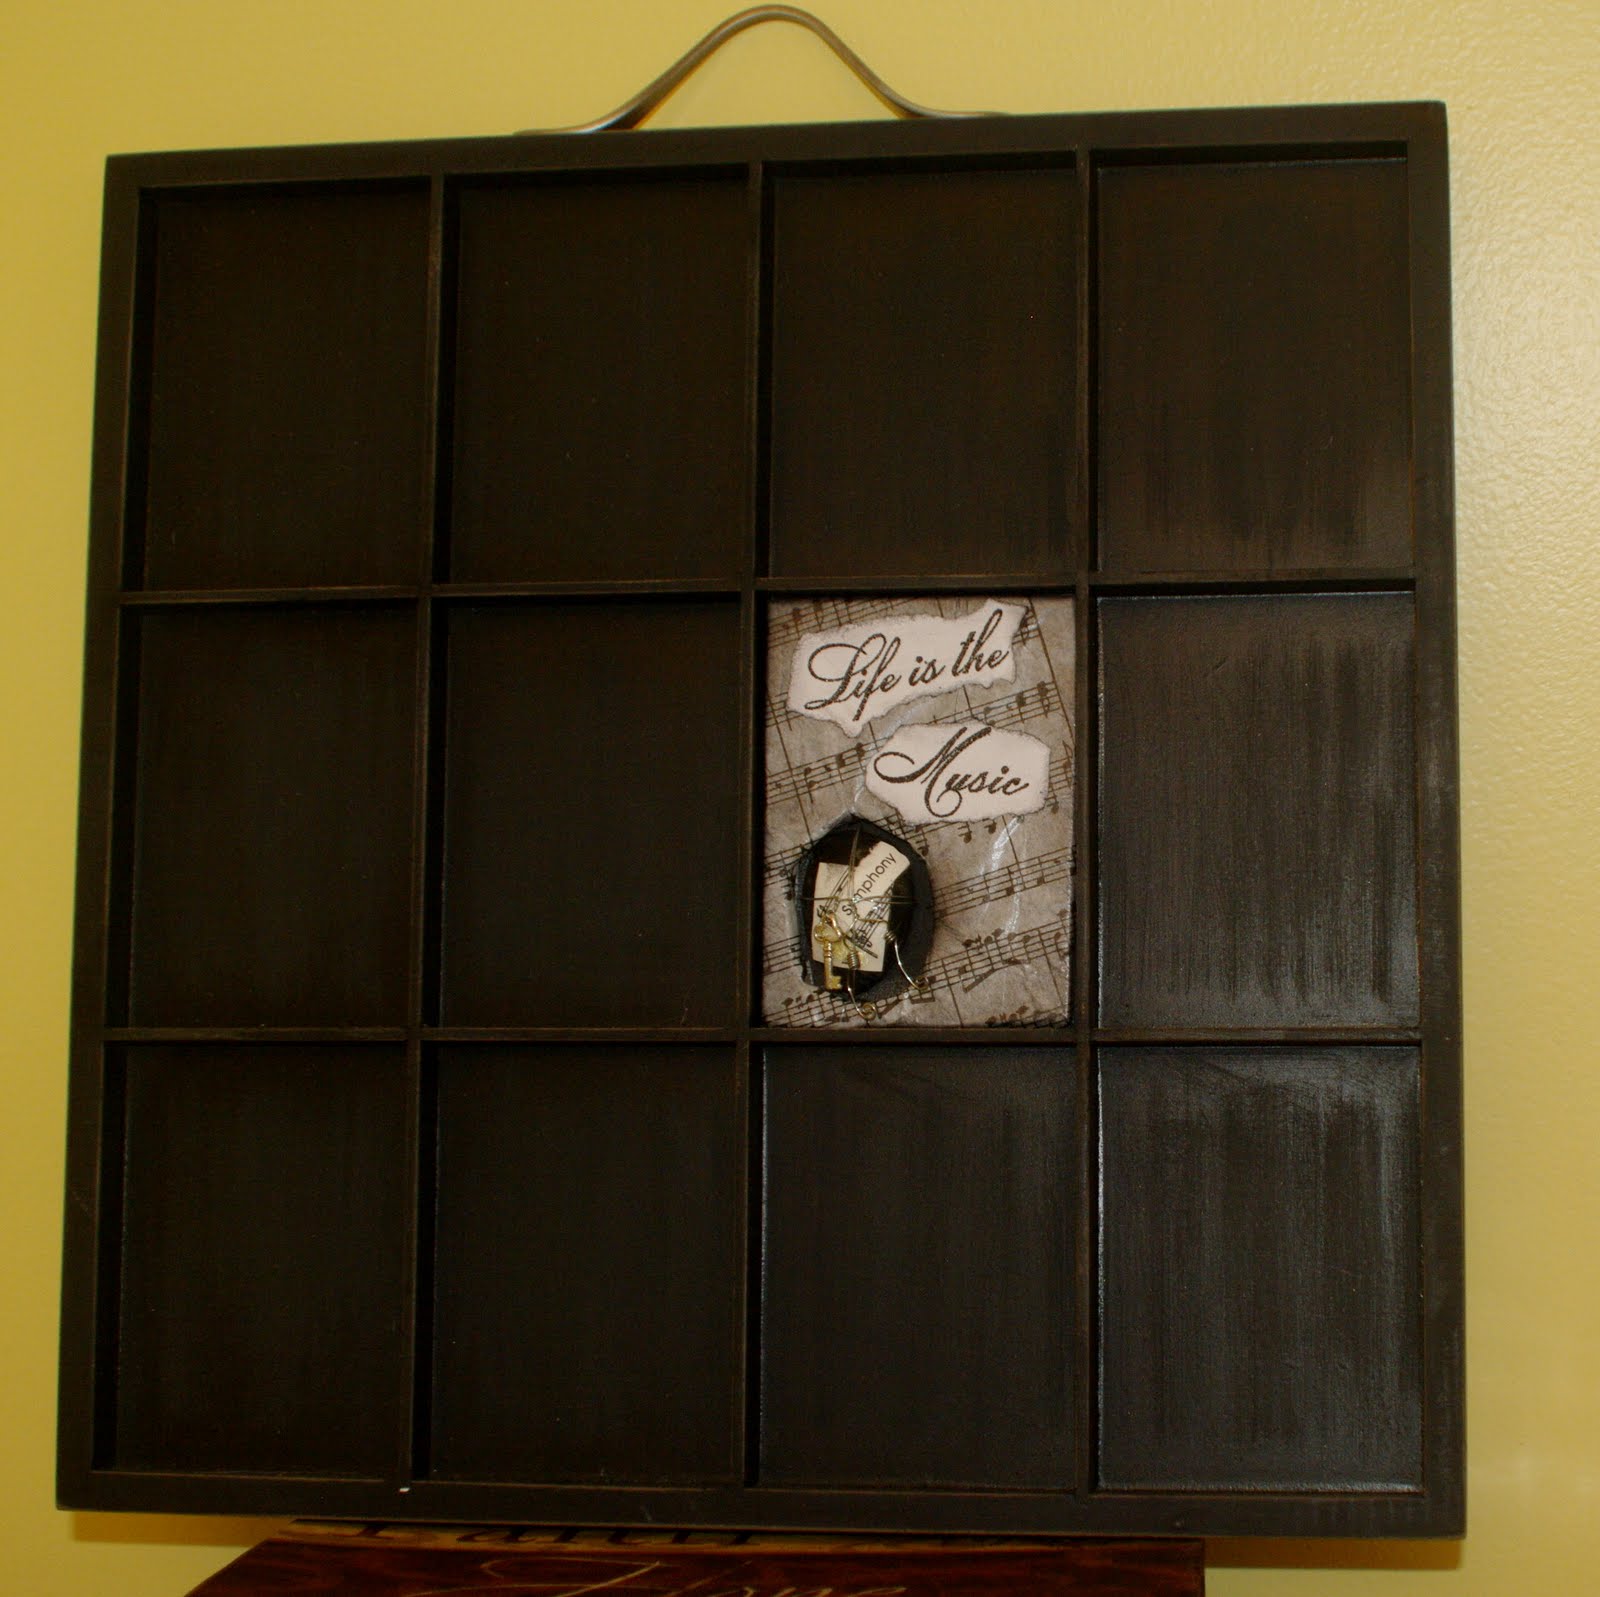
I re-read said novella, and thought..small might be good here. So an ATC it is---Oh, oh, oh....I have the 7 Gypsies ATC tray...I am now going to use that for my Grungy Monday projects! It's a tad larger than true ATC's, but no matter. AND!!! I have some double thick foam from doing the masks from our first challenge, which worked brilliantly! Next...what to use for the insert?? Found this little wire-wrapped rock which has been in my stash since FOREVER! Some sheet music tissue paper was still out on

my desk, and WHAM! Done!! I don't think I've ever pulled a project together so quickly--I think my muse either collapsed or ran away, as the rest of the afternoon was a complete bust--but, overall, I'm happy with my first go-round with this technique!! Of course this is a two week technique--(maybe thats why I was done so quickly! LOL!) so I may try something else later.


So, Don't be daunted by all the steps!! Go visit Linda's, see what everyone else has done, go re-visit Tim's blog, and then jump into a new dimension! Have a great week everyone!


WOYWW #99


OK, this didn't do it either.... /sigh.


You see, I took the day off from work, The morning was filled with car estimates (new car needs new brakes all around!!??) puppy issues (nails clipped, new chew toys and then a vet visit for annual shots) Dakota was supposed to be a bit lethargic after the shots...(a super plus for a 2 year old husky! LOL) so the rest of the day was MINE!! ALL MINE!! So I go off to my space, puppy takes new bone and curls up on the futon..things are so promising...and after a really quick, suprisingly good Grungy Monday piece (see that on next post) I want to start on some cards for a show...and nothing!! Move stamps around..nope, rifle through some papers, nada;


So, many of you have preached the whole "need a clean area for new beginnings"; so this is the result...and I gotta say....nope; now my creative muse has totally fled..perhaps like the cats, she needs some places to sit behind, and peak out from. So, tonight I'll dump some inks, walk away, and hope she comes back to play...


So to see some real workdesks in action, go hop over to Julia's Stamping Ground and see whats goin' on...

Wednesday, April 20, 2011

Grungy Monday #4! Texture Fades & Distress

OK---How much fun is this!!!!! Don't know what I'm talking about? First stop over to Linda's Studio L3 and see what Grungy Monday is all about, then Head over to The Amazing Mr. Tim Holtz's site, and peruse his You Tube video for this amazing technique!


I only have a few of his first texture fades, not any of the empty space ones---so you know a few of those will now be on my wish list! And yes, I did cut the middles out of most of them so I can slip in a tag to get the bottom embossed (first one was a tad scary!-I'm the girl that couldn't tear a page in my first altered book class-things were to be left pristine! LOL!) I think most of my fun came from not really having a clue as to what was really going to show up. Up until now, I kept feeling I was embossing them backwards...err, reversed, ahhh, the wrong way...and yup, I was! LOL! (Explains why my bingo one took 2 tries!)


So, after playing with them, I ended up using the Bingo one, which had Mustard Seed DI on the texture fade, Fired Brick swished over the tag, and then real bingo markers (from the old magnetic wand days!) attached. The ticket came from his Odds and Ends set, the saying is from a company that for the life of me now, I can't remember, but sorta fit, and the bingo collage is again from an old stamp I've always wanted to use -yup-virgin rubber- and colored with pencils. And can someone tell me--how is it I have NO red fibers??? So some gold (preciously horded) mohair yarn was used.


Here are a few of the others I experimented with....I'm sure they'll be cropping up for something fun!


So, go start texturing away! And have a very Happy Easter everyone!

WOYWW #98


Good morning bloggers!! As I actually had time to craft last night, and won't again until probably Friday, I snapped these shots before I turned out the light, so, barring kitty intervention, this should be what's up there this morning! LOL! Last night was BUSY!! (Love that I brought home chinese take-out; no meals to cook, no kitchen to clean-just feed the man and the animals-then upstairs I went! On the next post you can see what I did for the Grungy Monday Series! But after that bit of inky fun, I continued with my canvas's from last week.


Workdesk #2: I broke out my new melt-pot, poured in the wax pellets, and waited for them to melt! Hmm, took a while, I'll work on the letters. Remember, I have watched that segment of Tim Holtz's DVD a good 10 times now, so I felt prepared to proceed with the petoleum jelly resist; SO WRONG! What a gooey mess I made! but, my fingers are much softer today! Then they have to dry, so back to the melt pot--and even though Tim said the higher the temperature, the longer you ahve to work with the wax, he obviously assumed room temperature was something from an Arizona average; not upstate NY with the winds howling and my house bearly 62 degrees!! That wax practically froze on the canvas!! LOL! And I had wax everywhere (again, not quite a paraffin cuticle treatment, but 2 of my fingers look much better! LOL! But, I still think these came out really well for first time!


Workdesk #1: Back to the letters, the Adirondack Demensional Pearl paint seemed dry, time to rub off the vaseline jelly stuff; and that paint just peeled off!! Is it supposed to do that?? I did use a matt black base; so, I hoped for more paint to stick, but this is what I have left (And anyone trying this; buy stock in Bounty or any other kitchen paper towl company! The dividends will pay for your next hobby fix!LOL!)


So, those are my two busy desks!! Now jump over to Julia's Stamping Ground, and see what everyone else is up to!! Have a very Happy Easter everyone!


Monday, April 18, 2011

Random Sample of Cards


Hi Bloggers--Sneaking a few minutes break at work (there are times I think I should take up smoking-just to get the same break times; good thing I'm too stingy to spend money that way! LOL) to post some cards I've made in the last week or so--April is a very busy B-Day month!


This is one for my Mother in Law. I should make this a game: Who can spot the most Tim Holtz Compendium Techniques used??


This is for my Sister in Law...and I have to say; it really grew on me!! You can just make out the multi-medium resist on the background!


This one is for my Brother.. (above). And the Lily is for my Manager. And a couple of Get Wells for work...


And lastly...to the left...a thank you for my B-day present from my Sister in Law (different one from above). She found this stamp in Florida; the woman designs them all, and of course I wrote the company down, but left it at home! I'll be using it again though, so keep an eye out!


Hmm, seems a messy hodgepodge; I tried to lay them out nice, but blogger has taken over...and my "smoke" break is over, enough fussing around. I hope you enjoyed them! Have a great crafty week everyone!

Friday, April 15, 2011

GM #3--Color-wash-ific?


Adirondack Colorwashes---This weeks subject for Linda's Studio L3 Grungy Monday Series, where we explore the techniques and products of Tim Holtz. Hmm, yes, of course I have a few, or so. I have actually taken a class at my LSS making realy cool backgrounds on watercolor paper. So, let me preface: 1) That was a few years ago 2) I have the original bottles, which I don't want to get rid of, but my denim sprays sideways, a few dribble down the sides, and the raisin just seems to pour out of the mister top if tilted greater than 45 degrees 3) Couldn't remember which type of watercolor paper; mine is obviously the wrong one. Oh, and 4) it involved the nefarious iron (need I say more)


So, with much messiness; crazy spraying and deciding the watercolor paper wasn't working, getting the iron out afterall, I went with trying them on a tag. Much better! Thank heavens! LOL! This is butterscotch and terra cotta. OK, now I just had a tag..so, I broke out my trusty big shot, and used all the awful, wrinkly watercolor papers and made the scroll and flowers. And yay!! The bright leaves really pulled it off! They were lettuce and stream; the flowers were butterscotch, terracotta and raisin, and the scroll was butterscotch and eggplant. (The denim is on my new storage cabinet and my newly cleaned carpet) Oh, and all had an overspray of gold perfect pearls in a mini mister (because my tattered angels mists are completely clogged--hmm, better start using things more regularily! LOL!)


So, on my next non-windy day (it will be a while; I live in a wind tunnel! LOL!) these puppies are coming out and getting totally cleaned, purged, etc. and see if I can get those sprayers working right. Maybe I might just need to get the new smaller bottles! Because they really do lend themselves to great backgrounds. So head over to Linda's and see all the otherways these sprays can be used. Have a great weekend everyone!

Thursday, April 14, 2011

WOYWW #97


Here they are!!! Just before I turn out the lights Wed. night...aren't they beautiful?? (Oh, no, not the Reese's! They were long gone!) No, the canvas's! I had gotten Tim Holt'z 2nd DVD, "The Journey Continues" at Christmas. His altered canvas with beeswax facinated me! Since then, I have been on a quest to find natural canvas. The credits listed Canvas Concepts. They were still around, but only do wholesale now. And when I got their distribution list, sure, stores carried the white, gesso'ed canvas's, but not the natural ones. (I had even managed to place 2 orders, Mid West Scrapbook Supplies cancelled it almost immediately, and Sears went so far as to give me a tracking number and date of delivery...only once that day came and went, and I called them, they told me the product was no longer available, did I want a credit???) So, after emailing the company rep 5, er, 6; maybe 7 times..she finally hooked me up with an 8 x 8 inch pack! They arrived Tues! Of course Tim's segment lasted about 15 minutes, start to finish....these took about 15 minutes, and still had to dry! LOL! Hopefully I can start the beeswax portion on my next craft break-away; and get the letters and everything else ready and complete by the weekend!! If "pleading" a migraine to call in sick didn't always bring the real thing...I'd be all waxy now-LOL!


So, jump on over to Julia's place, and check out hers and everyone else's busy, beautiful desks! And keep peeking in on me; I'll post those canvas's as soon as they are done!

Saturday, April 9, 2011

A Grungy Monday Resist...


Welcome to the 2nd week of Grungy Monday hosted by Linda at Studio L3. This week, we visit Ranger Ink to delve into Distress Inks with Studio Multi Medium. Our instructions come from Tim himself, which I had to get to work early to download and watch. I took brief notes; it seemed fairly straightforward, and totally cool! Proof that Tim is a great instructor! (I will get to a class of his before I die..I swear!) And then life intervened, and its 5 days later. Hmm, where did I put that post-it with my notes?? Originally I figured I would use cut n-dry foam for my stamp, but then various posts on the "All Things Tim" yahoo group led me to believe it would be too thick, so I ran out to Joann's and found some craft foam.


Now, once cut, how to stamp with it??? Hmmm, I found some really thin ez-cling for unmounted stamps..sounds perfect! Now, which of my very few dies to use?? Ahh, my new butterflies!! (OK, and here, you can hold me to this...I Promise..this will be the last project I do with those butterflies for a mont..few weeksss...ok, at least a week!)


So, being very proud of my cling-mounted, professional looking butterfly stamp..time to get with the rest of the project. I cut some Basic Gray Origins paper to fit the tag, then started the resist; and it is indeed very cool! (You may remember, I'm always looking for easy ways to reverse stamp, as most white inks, quite frankly, suck!) After drying (I remembered!), I inked up my paper with Forest Moss and Walnut Ink DI's. And, wow, those 3 butterflies popped!! I stamped the verse (Penny Black) with Archival ink, then filled in the corners with some tattered flowers also made with the Origins paper. Added some fibers, and lo and behold; you can't really see those beautiful butterflies!

This is one technique I'll be using again and again! Especially since I discovered that the multi medium easily washes off rubber stamps too if caught quickly (yea, don't ask...) So hop over to Linda's, check out Tim's video, and start resisting away!

Saturday, April 2, 2011

Play Date Cafe Challenge #75


Wow, quite the busy blog week for me! This one is for the Play Date Cafe Challenge, #75, Silver, Pink-ish and Blue-ish. The photo guide was from the Monopoly game...so you know which colors I'm talking about. Now, I have to confess... I had absolutely NO idea where I was going with this!! I started by pulling papers--always the first step when there is no game plan! LOL! When going through the stamps, this mask had the mask that I made still on the top, which was pinky and purple-y from the Compendium Challenge, so that sorta pulled me in. Still had no clue what was going to happen...embossed with silver; looked cool. Had to cut out the eyes...and things got a little weird from there! I'm still not sure I like it..or what I'll do with it...but here it is!


The Mask stamp is from Judykins. the Eye from Tim Holtz, the graphic grid from Stampers Anonymous (one of my fave stamps!). I used Tattered Rose Distress Inks on the face, Victorian Velvet DI on the lips, and the silver (really--I just need to find a way to calibrate my eyes, the camera display and my computer screen so they all match) ribbon is from ReallyReasonableRibbon.com. So hop over the the Cafe to see what everyone else is brewing. Have a crafty weekend!